A few mothers I have spoken to seem to be put off by making there own baby food. They see it as a protracted proces and insist that is time consuming,; I'd like to change these opinions with this post.
It really is as easy as 1-2-3 and you can do it and still have time to chill with your baby in between.
Let me show you how I put my Munchkin baby grinder to work in this step-by-step guide.
Step 1- Decidee which vegatables you want to use
I am pretty health concious so I decided that my son's diet should consist of fruit and veg only and typically only those that are Alkaine (as opposed to Acidic). It isn't a fab diet, foods that neutralise or balance the bodies ph balance are healthier as acidic foods lead to most common health problems.
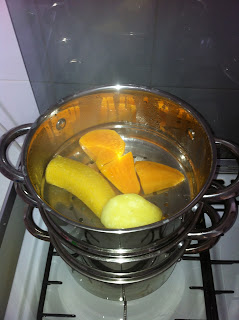
I chose Parsnip, Sweet Potato and Plaintain.
If you want a fruity combination why not try pear, peach and plum.
Step 2- Steam the veg/fruit
Chuck your veg into the stem until soft. This takes about 20 minutes with most vegetables, but it really depends on how soft you want them.
I decided not to give the potato or Carrot to my son as they are considered acidic, but they are an option you could chose.
Step 3- Introduce the food to the grinder
Step 4 - Grind!
Once completed I put the food in a container, here I'm using Brother Max Stage 2 weaning pots, then I mix to make sure there are no lumpy bits. I then move them into some smaller containers I got from Boots as they are just about right for each food setting with my son.
If you don't wish to use it right away you could quite easily pop the wening pot into the freezer.
It reall is that easy people! I urge you to reject preprepared baby foods and make your own; what kind of combinations do you try? I'm always on the hunt for new ideas.


No comments:
Post a Comment